


The camera, of course. But also Photoshop!
In this short post I suggest tips on how to modify images in Photoshop with basic editing skills. Specifically, I consider Adobe Photoshop Elements 2019 enhanced with the Elements+ plugin.
The Image Editing Process
In digital photography, a picture is captured by a camera’s image sensor and then compressed and stored as an image file (usually JPEG). Instead, camera raw files are photo negatives, in other terms are uncompressed proprietary (Canon, Nikon, Fuji, Apple, etc) file formats. Finally, your general image-editing tasks should be performed in a specific order (a workflow):
- Cropping, rotating, and straightening
- Tone and contrast adjustment
- Color adjustment
- Retouching
Note that by working on raw images the edits (crops, straightens, etc) are not written back to the original raw file but are kept in a separate document. Once you are satisfied with your general editings, you can close the Camera Raw Editing and work on specific issues (like spotting and cleanup, increasing exposure, or changing a channel in a specific part of the image).
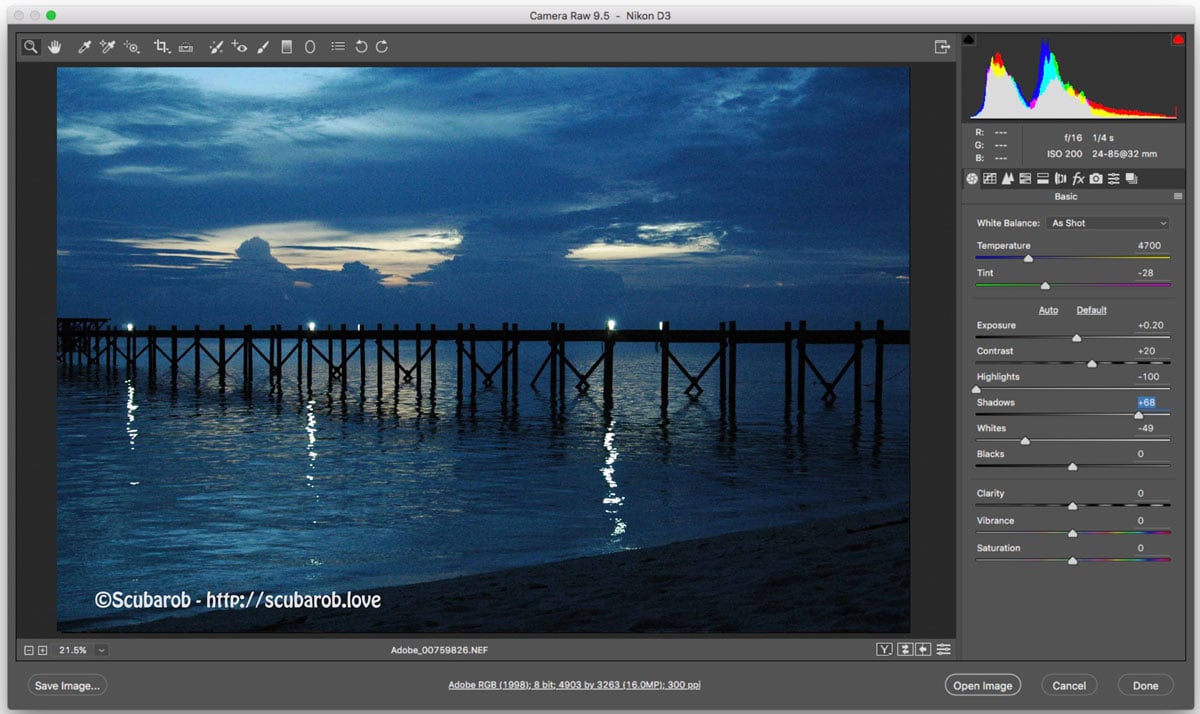
Histograms and Tones
You can think of a color channel (for instance, the red one) as a lens through light is projected. If you let all light pass through the channel, you end up with a bright red. If you screen that light a little with a gray filter, you let less light pass through, thereby diluting the red color. An important tool to be understood is the histogram because it graphically represents the distribution of tones from black (left) to white (right) in three key areas of the picture: shadows, midtones, and highlights. Specifically, it can represent each tonal range in the RGB space as different levels of gray in each channel.

A proper exposed picture includes tones in all the three areas (shadows, midtones, and highlights); thus, histograms have bars across the full tonal range. In the example above, all the channels have bars in the three regions, but the highest bars are in the shadows suggesting the picture is well exposed but has a lot of dark; for instance, a dark background with a bright foreground. When a single channel is over-exposed, the pixels in the image are infused with full color; that is the case of the highest bars. If the three channels are over-exposed in the same tonal range (highest bars in same region in each channel), pixels are infused in pure white resulting in loss of information. The opposite situation (shadow clipping) happens when the bars are absent in some region for each channel.
Choosing a Raw Editor
Now, while all such stuff may appear a bit on theoretical side, having a conceptual base may help you in understanding your camera, your photos, the retouching process, and in saving some dollars. Indeed, such concepts apply to (in order of dollar expense) Photoshop (Cloud or Elements), ON1 Photo Raw, and The Gimp (using additional tools). Once you understand what is going to happen to your image, it is just a matter of taste and wallet.
Editing with Photoshop
By selecting a raw file, the Raw plug-in will nicely preview your image with the tools toolbar on top and the Basic panel on the right.
According to our general workflow you may select the crop, rotate, and straighten tools in the toolbar. Instead, the remaining controls can be performed using the sliders in the Basic tab.
The clue for making proper adjustments is the histogram; indeed, while moving the sliders, you should try to keep an even tonal range across the histogram without clipping the image (showing spikes on either end of the graph). For such purpose, you should enable the Shadow/Highlight Clipping up-pointing arrow buttons above the histogram. The tool shows clipping in the shadows (in blue) and in the highlights (in red).
Tone and contrast adjustment
- Exposure: you can adjust the exposure as you were using the compensation control on your camera. As you drag the slider to the right you brighten the image and the histogram shifts to the right (towards highlights), whereas as you slide to the left, it shifts to the left (towards shadows).
- Blacks: it adjusts the darkest quartertones in your image leaving the midtones and highlights unmodified.
- Brightness: it adjusts the middle tones in your image leaving the white and black points untouched; usually, the middle tones contain most of your image data.
- Contrast: it adjusts the white and black points to increase contrast in your image, but it proportionally redistributes the intermediate values.
- Fill Light: it brightens dark areas of the image and accordingly decreases and adjusts the intermediate tones between shadow and midtones to avoid reducing the blacks in the brighter areas.
- Recovery: when an area is overexposed but not in all three color channels, Camera Raw can use such channel to rebuild the information lost in the overexposed part of the image. As you drag the slider to the right, it will darken the brightest tones in the image, recovering highlights in overexposed areas (if possible).
Color adjustment
- White Balance: the control defaults to As Shot, the value the camera was set at shooting. You can adjust what your camera guessed to be the best value to your experienced lighting conditions using some presets (Auto, Daylight, Cloudy, Shade, Tungsten, Fluorescent, and Flash) or dragging the slider. Select the White Balance Eyedropper by holding down the Shift/Option key and click a part of your image that should be neutral, that is a medium-tone gray.
- Tint: while adjusting the white balance you may notice some green or magenta color cast; thus, you can correct such cast using the Tint slider. Indeed, whereas the White Balance slider shifts from blue to yellow, the Tint slider shifts from green to magenta.
- Saturation: it allows to adjust the richness of colors, how much colors are saturated; however, over-saturation may result in posterizing (a grayscale picture).
- Vibrance: adjusts the richness of colors but it protects certain tones as the ones in flesh. At the opposite, vibrance can desaturate an image without affecting flesh tones.
- Clarity: sharpens fine details without reducing softness in the image.
Retouching
The functions can be selected from the Details panel, just above the exposure slider in the Basic panel.
- Sharpening: it allows to adjust edge definition in the image using the Amount slider; specifically, the Radius slider adjusts the size of the details that sharpening is applied to, the Details slider adjusts how much high-frequency information is sharpened, and the Masking slider defines to restrict sharpening to specific edges.
- Noise Reduction: it adjusts the extraneous visible artifacts that degrade image quality. Image noise includes luminance (grayscale) noise, which makes an image look grainy, and chroma (color) noise, which is visible as colored artifacts in the image. Photos taken with high ISO speeds or less-sophisticated digital cameras can have noticeable noise.
Saving the edits
By pressing the Save button the Save Options dialog opens letting you specify location, name, and format. Such option is important because Camera Raw has only one level of undo; as a result, you may need to save your edits in multiple files in order to recover from a previous set of edits. If you don’t need multiple files or you’re happy with the filename and location conventions you may just select the Open button and the image with its edits will open in the editor. If you instead press the Done button, Camera Raw will just save the edits but it does not apply them to your image when opinion it in the editor. If you’d like to reset all your edits, by pressing and holding Alt/Option the Cancel button will turn into a Reset button.
Layers and Selections
Layers let you organize your work into distinct levels that can be edited and viewed as individual units. For instance, each tonal region can be selected in each channel allowing to recover information or a specific selected area of the image can be corrected (contrast, saturation, etc). In Photoshop, each image can have only one background layer that has unchangeable properties. The Layers panel lists all the layers in an image, and allows to hide, view, reposition, delete, rename, and merge layers.
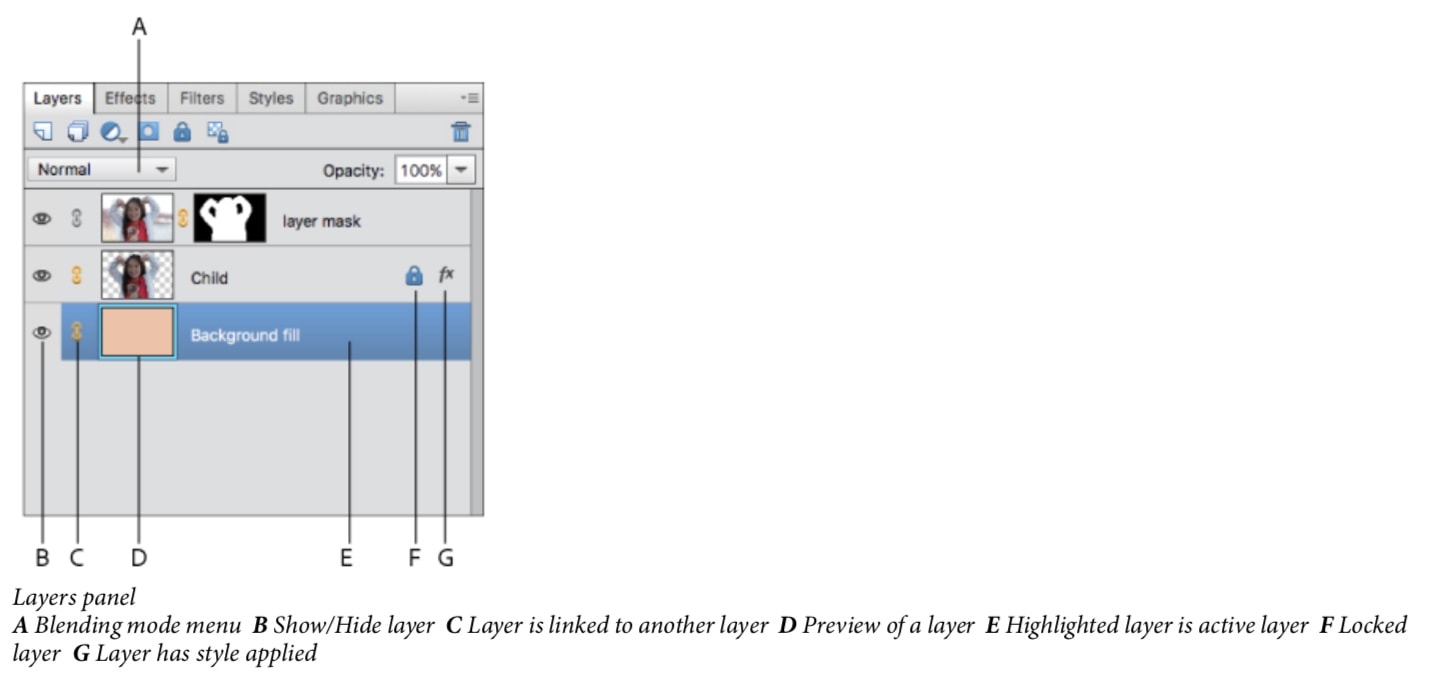
It allows also to modify for each layer its Stacking order, Blending mode (how the color pixels on one layer blend with pixels in the layers underneath), Fill (like a transparent colored or gradient sheet in front of the image), Locking, Opacity (the degree to which it obscures or reveals the layer beneath it), and define its Mask (a grayscale image, with parts painted in black hidden, parts painted in white showing, and parts painted in gray shades showing in various levels of transparency). Layers can be linked by selecting layers with ctrl and clicking the chain icon; layers can be grouped by selecting layers with ctrl and clicking Layers -> Group Layers. Adjustment layers grouped with a specific layer affect just such layer instead of all the layers below.
By employing layers, you can derive layers for the luminosity (grayscale) and color image information and selectively make changes to one or the other; as a result, color can be modified without affecting the luminosity and vice-versa.
How to Create a Luminosity Layer
- Create a Background copy layer
- Change the blending mode of the Background copy layer from Normal to Luminosity
- Create a blank layer above the Background layer
- Go to Edit > Fill Layer, 50% Gray, Mode Normal, Opacity 100%, Deselect Preserve Transparency
- Merge the Background copy layer and Layer 1
- Change the blending mode of the merged layer from Normal to Luminosity
- Rename the merged layer as “Luminosity”
- Deselect any other layer apart the “Luminosity” layer to work selectively in the “Luminosity” Layer
The “Luminosity” layer is usually the last above the Background layer since its modification is one of the last steps in any workflow.
How to Create a Color Layer
- Create a Background copy layer
- Move the Color layer to the top of the stack
- Change the blending mode of the Color layer from Normal to Color
- Rename the layer as “Color”
- Create a blank layer below the “Color” layer
Go to Edit > Fill Layer, 50% Gray, Mode Normal, Opacity 100%, Deselect Preserve Transparency - Rename the filled layer as “Block”
- Deselect any other layer apart the “Block” and “Color” layers to work selectively in the “Color” Layer
The “Color” layer is always at the top. You can also select each color channel in RGB space and remove color casts with the levels tool.
How to Create Separate Layers for each RGB channel
Photoshop Elements doesn’t have a Channel Mixer; however, you can start the Elements+ Channel Mixer going to File -> Automation Tools -> E+ Color and Tones then select RGB and Channel Mixer. The red channel is called the Contrast Channel because is usually the brightest channel with the most contrast. The green channel is called the Detail Channel because usually has the most image information (the human visual system is most sensitive to green). The blue channel is called the Noise Channel because is usually the darkest and contains the most noise.
Instead, if you want to selectively work on each channel, you need to employ the following procedure to create three filter layers that leave a grayscale layer of the considered channel. The first filter correspond to the considered channel, the remaining two channels are filtered out with two hue adjustment layers of 120 because red, green, and blue are 120 degrees apart from each other on the color wheel. Therefore, you need to tepeat the following steps for each channel:
- Create a Background copy layer
- Move the Background copy layer to the top of the stack
- Create a Solid Color Adjustment Layer from the Background Copy layer with 255 in the channel you want to isolate, for instance in the R(ed) box
- Change the blending mode of the Solid Color adjustment layer from Normal to Multiply
- Merge the Solid Color adjustment layer and the Background copy layer and renamed the merged layer as the selected channel, in this case “Red”
- Duplicate the merged layer
- Create a Hue/Saturation adjustment layer from the duplicated layer and set the Hue to 120 in the master channel.
- Merge the hue adjustment layer and the duplicated layer
- Change the blending mode of the merged from Normal to Screen
- Make a duplicate of such layer
- Create a Hue/Saturation adjustment layer from the duplicated layer and set the Hue to 120 in the master channel
- Merge the Hue/Saturation adjustment layer and the duplicated layer
- Make sure the blending mode of such layer is still Screen
- Merge the layers into the “Red Channel” layer
- Deselect any other layer apart the “Red Channel” layer to work selectively in the “Red Channel” Layer
Once you have create the Red Channel, Green Channel, and Blue Channel layers and applied the required adjustment layers (remember to group the adjustment to the channel layer), you need to recombine the separate RGB channel layers back into a color photograph.
- The layers should be arranged in the following order: Red, Green, Blue, and Background
- Create a blank layer above the Background layer
- Make sure the foreground color is black and Go to Edit > Fill Layer, Contents Foreground Color, Mode Normal, Opacity 100%
- Rename the layer as “Block”
- Deselect the eyes in the Red Channel and Green Channel
Repeat the following procedure for the Blue, Green, and Red channel:
- Select the considered channel, in this case the Blue Channel, and change its blending mode from Normal to Screen
- From the considered channel, create a Solid Color adjustment layer with Use Previous Layer to Create Clipping Mask Selected, Mode Multiply, Opacity 100%, change the color picker color to the corresponding channel color (in this case blue), and put 255 in the color of the considered channel but 0 in the others (in this case 255 in B(lue), 0 in the R(ed) and G(reen) boxes)
How to Create a Selection Layer
A selection isolates part of an image so you can work on that area without affecting the rest of the image; pixels of some parts of the selection (usually borders) can be partially selected by feathering, masking, or anti-aliasing the selection. For instance, to avoid distraction, you can use the Eraser tool to erase the portions of the image that will not be selected (remember: always work on a duplicate layer).
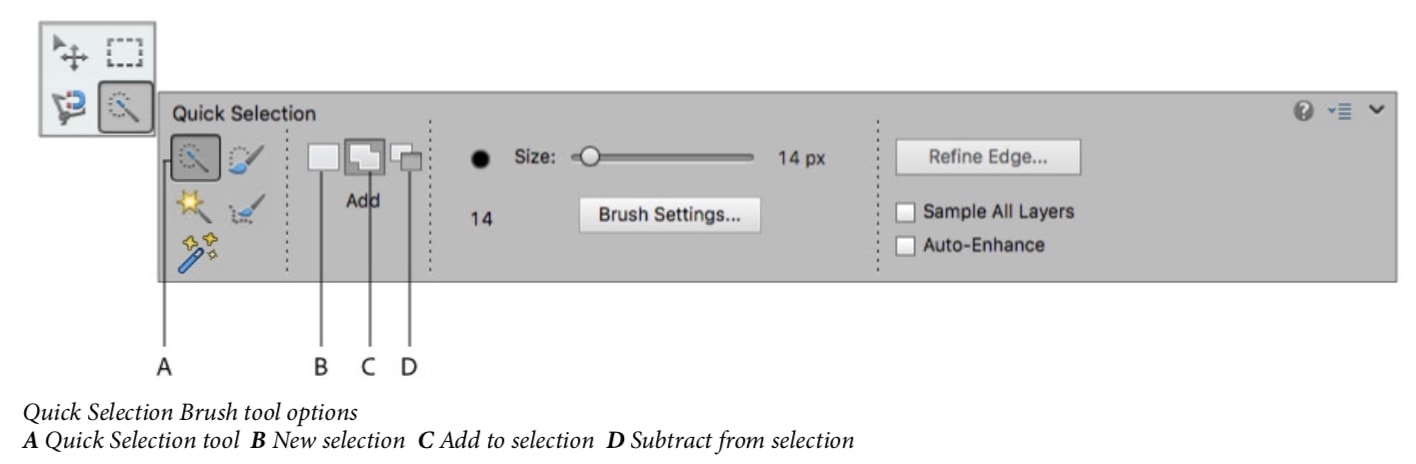
Photoshop includes various tools for selection, the most interesting is the Quick Selection tool that tries to find image edges and automatically stops the selection there. After your initial selection, this tool automatically switches to its Add to Selection option. To select more, drag over other areas. To select less, hold the Alt key (Windows) or the Option key (macOS) as you drag over areas to remove from the selection. Another tool is the Magic Wand which attempts to select all pixels similar to the color of your first click; similarity is given by the tolerance parameter (0-255, that is 1 to all colors). From the menu Selection you can save it and add further selections. Then click the Refine Edge button to bring up a modal panel where you can play with the feathering and radius options to smooth and soften the borders of your selection; you can also select anti-aliasing to slightly soften (1 pixel) the edge of an elliptical or irregularly shaped selection. Once your selection is optimized you can choose to output the selection to a Layer Mask, a New Layer, or a New Layer with a Layer Mask.

In the layer panel, select your just created mask and apply a fill or adjustment layer:
- Levels: Corrects tonal values in the image
- Brightness/Darkness: Lightens or darkens the image
- Hue/Saturation: Adjusts colors in the image
- Gradient Map: Maps pixels to the color in the selected gradient
- Photo Filter: Adjusts the color balance and color temperature of the image
- Invert: Produces a photo negative effect by creating a negative based on the brightness values of the image
- Threshold: Renders the image in monochrome with no gray, so that you can locate the lightest and darkest areas
- Posterize: Gives a flat, poster-like appearance to a photo by reducing the number of brightness values (levels) in the image, thus reducing the number of colors.
Then you can also adjust how your layer blends with the other layers (normal, darken, overlay, etc). Finally, note that selections are limited to the active layer—to make changes to all layers at once, you first need to flatten the image; in other terms, you need to combine all visible layers into a background layer by selecting the Merge Visible Layers option in the layers tab.
How to Remove a Color Cast
A color cast is a tint of a particular color affecting a photo; however, modern cameras neutralize most color cast. There a number of ways in Photoshop to reduce color cast:
- Levels adjustment layer
- Match color
- Curves adjustment layer
Levels Adjustment Layer
Repeat the following procedures for each of the RGB Channels:
- Create a Levels Adjustment Layer
- Change the Channel to Red (Click the arrow next to RGB and select Red from the drop-down menu)
- Take the darks slider (left) and move it towards the right until it meets the edge of the graph (if the edge of the graph goes all the way to the left, skip this step)
- Take the highlights slider (right) and move it towards the left until it meets the edge of the graph
Match Color
Such technique is mostly used when the color cast is dominant:
- Go to Image -> Adjustments -> Match Color
- In the window that appears, check the box for Neutralize
- Adjust the Luminance and Color Intensity sliders if required
Curves
The Curves adjustment layer is available in Photoshop Elements only trough the Elements+ Plugin. The Curves adjustment layer allows to make adjustments anywhere along the tonal range of an image to any of the data located between the highlights and shadows, on either the individual channels or the master channel.
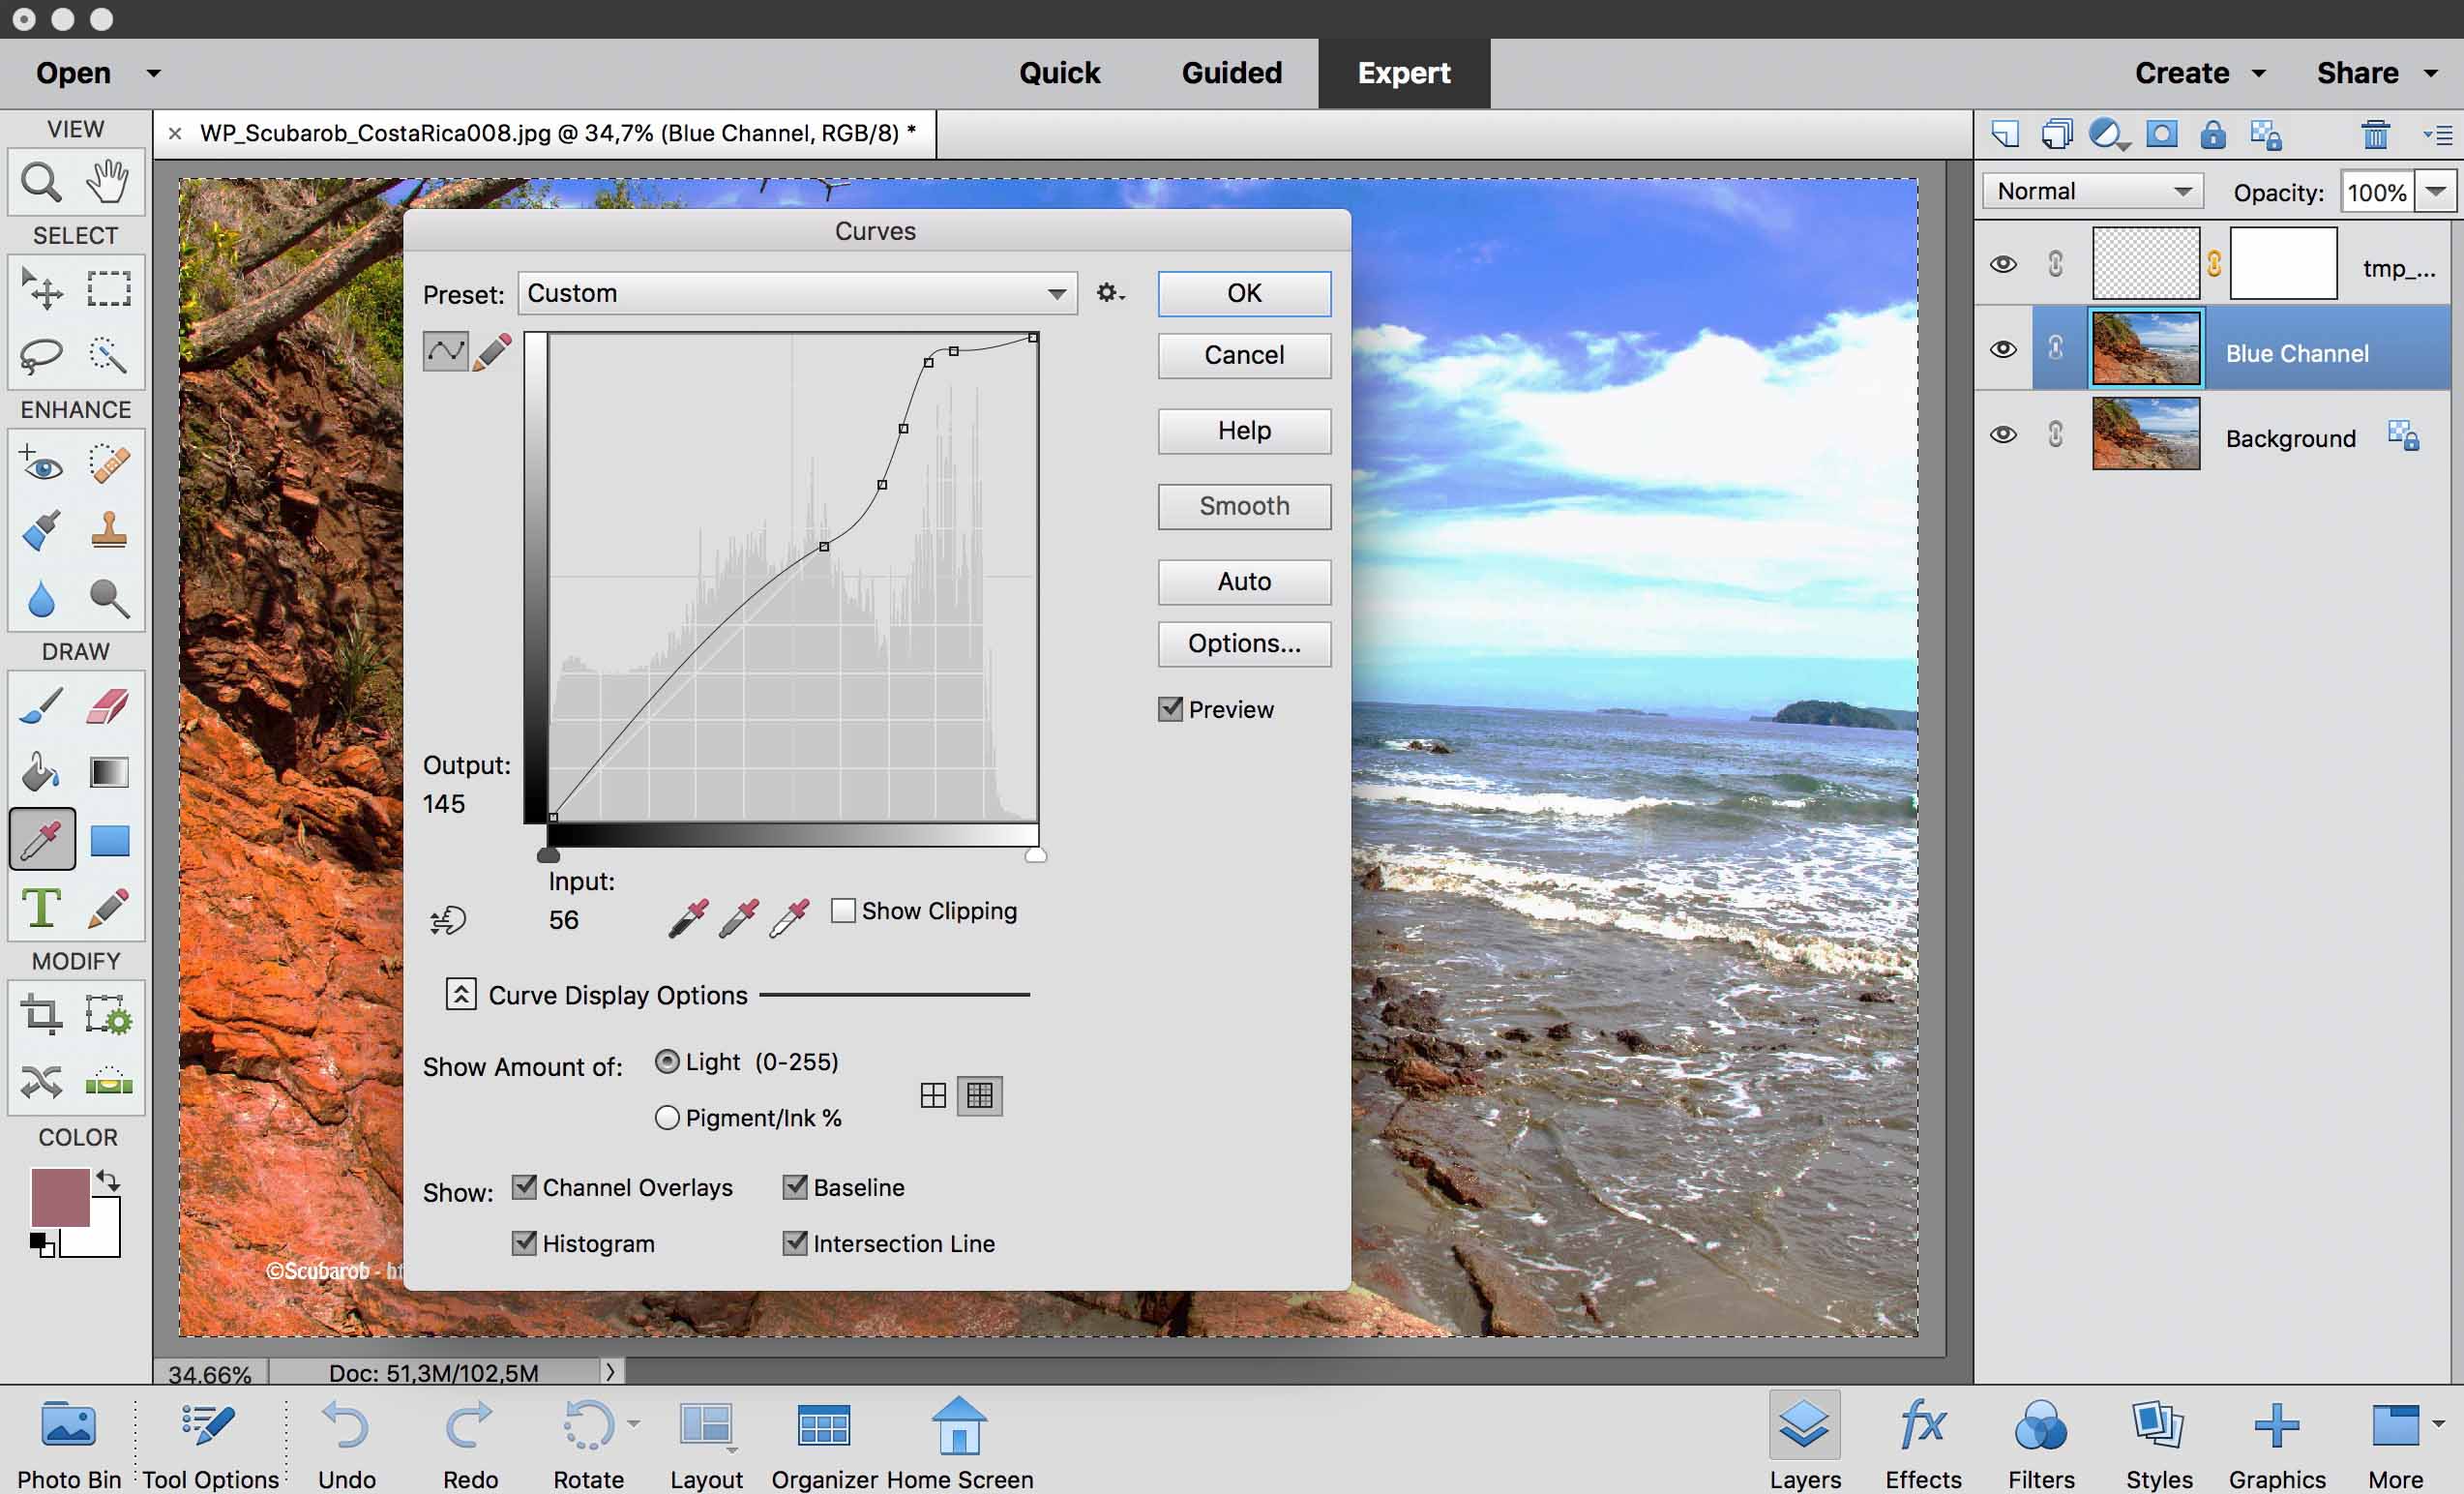
- Duplicate the Background layer
- Rename the Background copy layer as the channel, for instance “Blue Channel”
- Create a Curves adjustment layer by going to File -> Automation Tools -> E+ Color and Tones then select RGB and Curves with Use Previous Layer selected, Color Blue, Mode Normal, and Opacity 100%
- Adjust the curve as required, click ok. Check the two layers are grouped
- To modify again, go to File -> Automation Tools -> E+ Color and Tones then select RGB and Edit Curves
However, by examining the red, green, and blue channel histograms where and how they overlap in the full color version of the master histogram we can clearly see the color cast in the image. In practice, we shift one or more channels in the histogram to reduce the color casting:
Neutralization and Contrast Enhancement
Duplicate the Background layer and create a Curves adjustment layer as above:

- On each channel, drag the highlight and shadow sliders to the left and right respectively, until they meet the first uptick in data on the highlight and shadow ends of the individual channel histograms (Monitor the highlight and shadow ends of the histograms to make sure no peaks Add a Curves adjustment layer form against the highlight or shadow end walls)
- Specifically, you will move the highlight end of the casting color channel slider the most and the other color sliders the least
Overall Brightness and Contrast Enhancement
Duplicate the Background layer and create a Curves adjustment layer as above, but select None as Color in the New Layer dialog:
- To lighten the image, place a control point at the middle of the data on the RGB composite histogram curve. Then, while monitoring the highlight end of your histogram to make sure no peaks are created, move such midtone control point up
- To increase the contrast of the image, place control points at the quarter-tone and three-quarter-tone areas of the curve. Then, select and move the quarter-tone control point up and the three-quarter-tone control point down creating an S-shaped curve that concentrates data a bit more at the quarter tone and three- quarter tone

References.
Photoshop Elements Manual. retrieved from https://helpx.adobe.com/content/dam/help/en/pdf/photoshop-elements_reference.pdf
Photoshop Elements 12 All-in-One For Dummies
Hoiberg, C. (2015). Remove Color Cast in Photoshop Within Minutes. Retrieved from https://www.capturelandscapes.com